When you host your WordPress website with Kinsta, you will need to add and point your domain to us so that our servers can deliver your site to visitors. For an overview of the process of making your site live at Kinsta, be sure to check out our go-live checklist
Cloudflare vs. Non-Cloudflare Domains
In the context of this article:
- If your domain is already connected to Cloudflare through your own active Cloudflare account, then it is considered a “Cloudflare domain.”
- If your domain has no connection to Cloudflare (proxy or DNS), then it is considered a “non-Cloudflare domain.”
Users with active Cloudflare accounts of their own will need to follow a special set of instructions to maintain compatibility between the two Cloudflare zones (their Cloudflare account and our free Cloudflare integration).
If your site uses a Cloudflare domain, continue reading here for instructions on how to add and point your domain to Kinsta. If you don’t already use Cloudflare, see our How To Add a non-Cloudflare Domain guide for instructions on how to add and point your non-Cloudflare domain to Kinsta.
How To Add and Verify Your Domain in MyKinsta
These instructions are for new domains that are already using Cloudflare. If your domain is not already using Cloudflare, see our How To Add a non-Cloudflare Domain guide for the correct instructions.
Step 1 – Add a New Cloudflare Domain in MyKinsta
In MyKinsta, go to WordPress Sites > sitename > Domains, and click the Add domain button.

In the Add domain modal/pop-up, enter your domain name in the Domain field. If you want to add your domain without the wildcard subdomain (*.example.com) or if you want to add a custom SSL certificate, click on the Advanced Options link to see those options and make your selections.

If you want to add a custom SSL certificate while adding the domain, select Use my own SSL certificate with this domain and enter your SSL certificate and key in the corresponding fields.
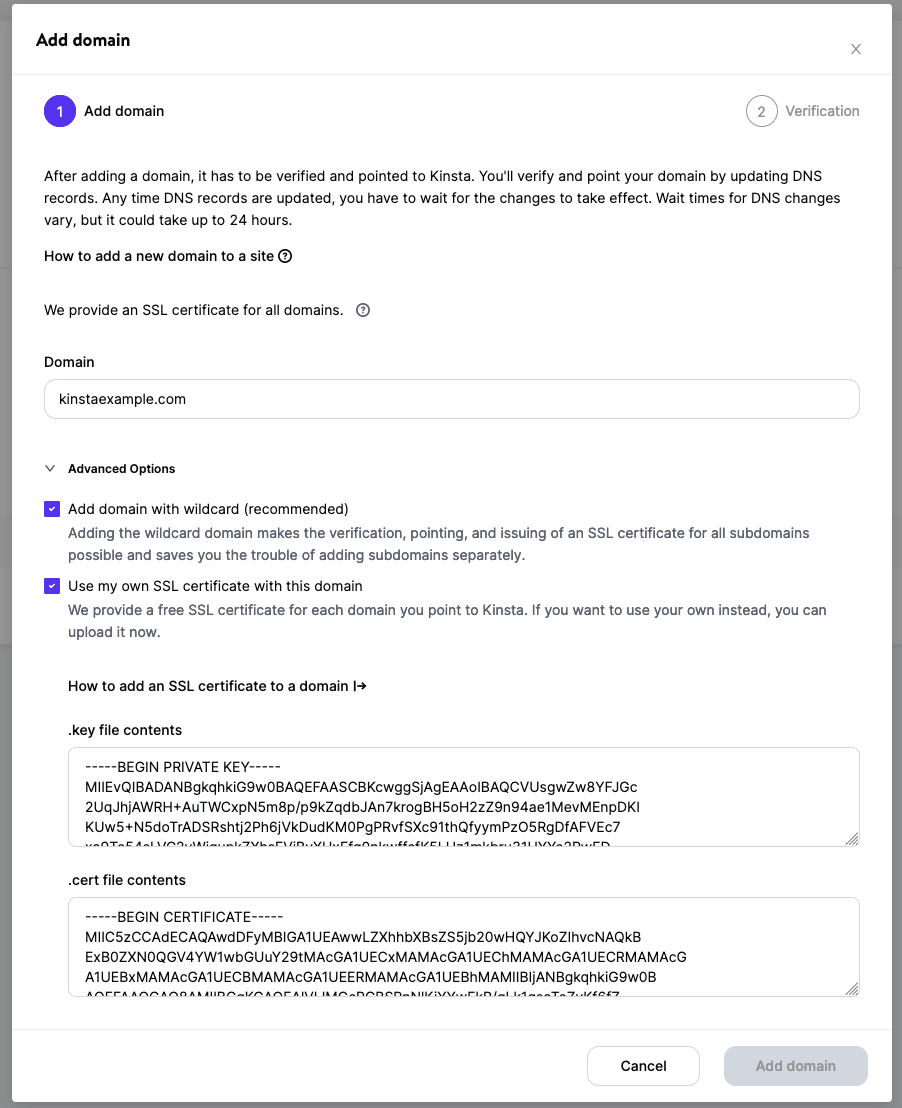
When you’ve entered the details for your domain and made your selections under Advanced Options (if applicable), click the Add domain button.
Step 2 – Verify Your Domain
Verifying your Cloudflare domain is a two-phase process. You’ll need to add a TXT record for the initial domain verification, wait for DNS propagation, then add 1-2 more DNS records to complete the verification.
In the modal/pop-up, you’ll see a single TXT record that you need to add at Cloudflare to begin verifying your domain. Copy the Name/host and the Value fields.

Phase One TXT Record
- Name:
kinsta-verification-xxxxxx - Value: Unique UUID value from MyKinsta (xxxxxxxx-xxxx-xxxx-xxxx-xxxxxxxxxxxx)
Go to your Cloudflare dashboard (log in if you haven’t already), select your domain, and click on the DNS tab. Click the Add record button and create a new TXT record with the details you copied from MyKinsta.

After you’ve added the TXT record at Cloudflare, click OK, I’ve done it in the Add domain modal window in MyKinsta.

Once DNS propagates (usually within a few minutes from Cloudflare, but may depend on the TTL set when adding the record), you’ll receive a notification email like this to let you know you can continue with the next phase of verification:

Return to your site in MyKinsta and click the Verify domain button. In the modal/pop-up that appears, you’ll be prompted to add 1 or more DNS records. Copy the Name/host and Value/Domain name fields for the DNS record(s).

Phase Two DNS Records
TXT Record
- Name:
_cf-custom-hostname - Value: Unique UUID value from MyKinsta (xxxxxxxx-xxxx-xxxx-xxxx-xxxxxxxxxxxx)
CNAME Record
- Name:
_acme-challenge - Domain name:
example.com.kinstavalidation.app
Go to your Cloudflare dashboard once again, select your domain, and click on the DNS tab. Click the Add record button and create the new DNS records with the details you copied from MyKinsta.
After you’ve added the DNS record(s) at Cloudflare, click OK, I’ve done it in the Add domain modal window in MyKinsta.

Once DNS propagates (usually within a few minutes from Cloudflare, but may depend on the TTL set when adding the record), you’ll receive another notification email to let you know your domain is fully verified and can be pointed to Kinsta:

How To Point Your Domain to Kinsta
After your domain has been successfully verified, you’ll see a Point domain button next to your custom domain in MyKinsta. Click this button to start the domain pointing process.

Point Your Root Domain to Kinsta
To point your root domain to Kinsta, add the first CNAME record (Name/host @) shown in the Point your domain to Kinsta modal/pop-up to your Cloudflare DNS settings.

Go to your Cloudflare dashboard and click on the DNS tab.

After deleting the A record, click the Add record button and create a new CNAME record with the details below:
- Type: CNAME
- Name: @
- Target: Your site’s “hosting.kinsta.cloud” domain (as shown in the Point your domain to Kinsta modal/pop-up)
- TTL: Auto
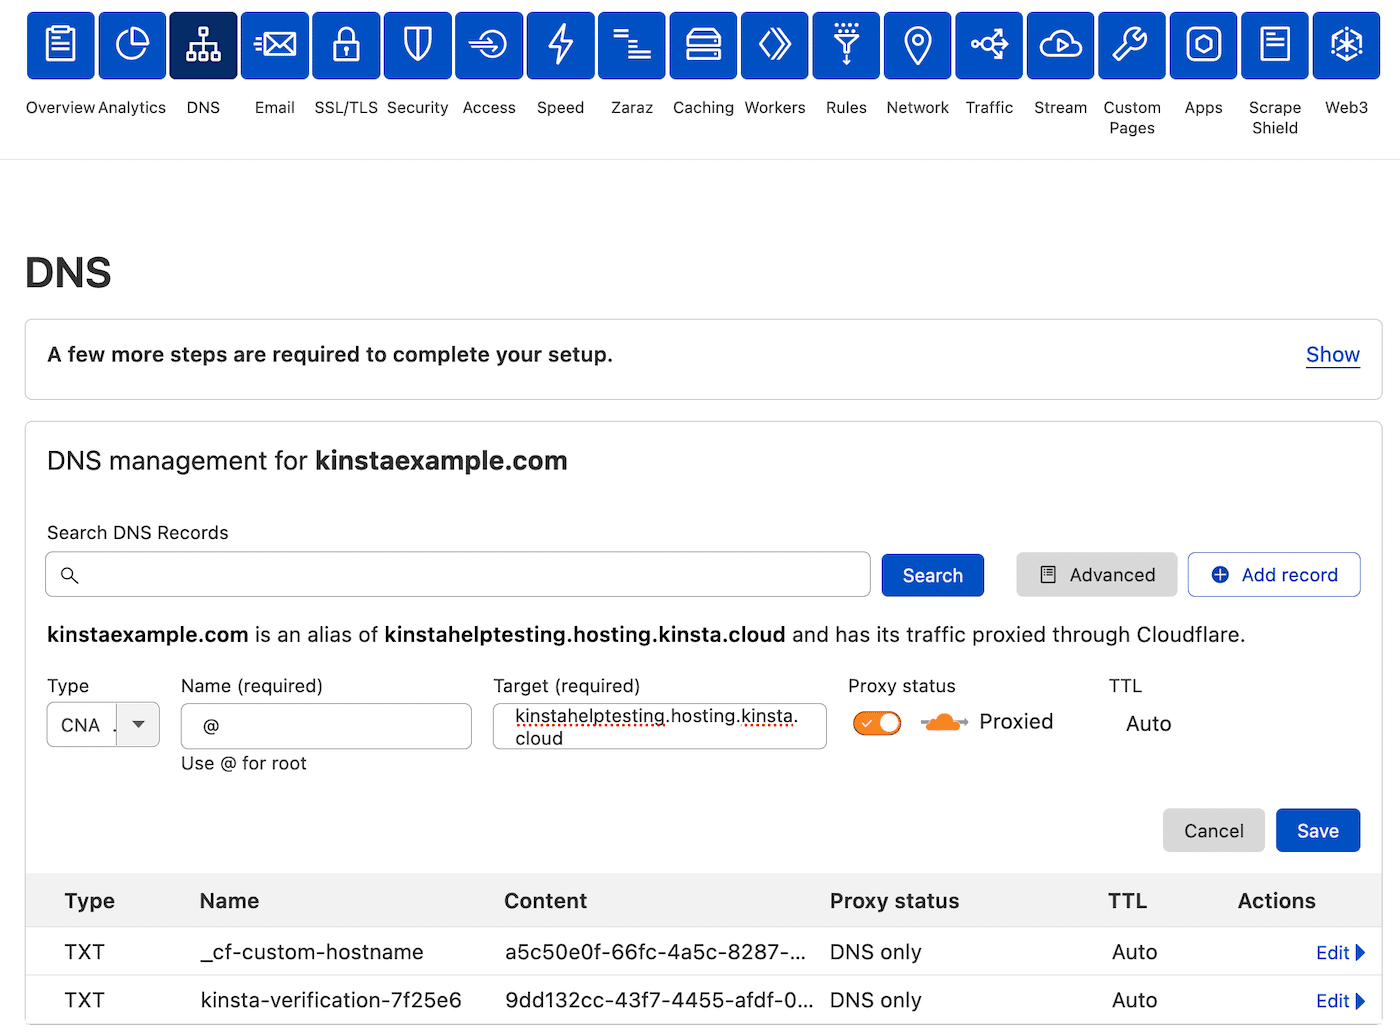
After adding the CNAME record, you’ll see a checkmark next to your root domain in MyKinsta. This indicates that the root domain has been pointed to Kinsta correctly.

Point Your WWW Domain to Kinsta
In addition to configuring a CNAME record for your root domain, we also recommend pointing the www version of your domain to Kinsta.
After deleting the conflicting CNAME record, click Add Record to create a new CNAME record with the settings below:
- Type: CNAME
- Name: www
- Target: Your site’s “hosting.kinsta.cloud” domain (as shown in the Point your domain to Kinsta modal/pop-up)
- TTL: Auto

Create a CNAME record for your www domain at Cloudflare.
Point Your Wildcard Domain to Kinsta (Optional)
We also support wildcard subdomains. A wildcard subdomain is a “catch-all” subdomain. For example, if you have three DNS records set up like this:
- A record for sub.domain.com pointing to 123.123.123.123.
- A record for sub2.domain.com pointing to 456.456.456.456.
- A record for *.domain.com pointing to 789.789.789.789.
Any request to a subdomain that is not sub.domain.com or sub2.domain.com will be automatically handled by the *.domain.com A record and routed to 789.789.789.789.
If you would like to use the wildcard domain functionality on Kinsta, first check the following:
- Make sure you added your wildcard domain in the steps above. If not, you’ll need to remove the domain, add it again, and make sure Add domain with wildcard is selected.
- If you added a custom SSL, make sure it supports your wildcard subdomain (*.example.com).
Then, you can create an additional A record with the settings below:
- Type: CNAME
- Name: *
- Target: Your site’s “hosting.kinsta.cloud” domain (as shown in the Point your domain to Kinsta modal/pop-up)
- TTL: Auto

If you’re using a free Cloudflare plan, you may see a message that reads, “Some of your DNS only records are exposing IPs that are proxied through Cloudflare. Make sure to proxy all A, AAAA, and CNAME records pointing to proxied records to avoid exposing your origin IP.”
This notification message is normal and not an issue, in this case, because the target kinsta.cloud domain is proxied behind Cloudflare as well.
Once the wildcard CNAME record has propagated, accessing any subdomain that isn’t pointed elsewhere will result in the request being routed to Kinsta.
Force HTTPS (Optional)
While technically optional, forcing your site to load over HTTPS is recommended. With our Cloudflare integration, once your domain is verified, a free SSL certificate (with wildcard support) is automatically added to your site. The only thing you’ll need to do is head over to your site in MyKinsta, then go to Tools and click on the Enable button under Force HTTPS.

Troubleshooting the Fix Domain Error
During the domain verification process, if a Fix domain error button appears next to the domain, this means a CAA record conflict is occurring.
A CAA record is an optional DNS record that lets you specify which certificate authorities (CAs) are allowed to issue SSL certificates for your domain. If a domain has no CAA records, any CA can generate an SSL certificate for it if requested. If a domain has a CAA record, only the CA(s) specified in the CA record can generate an SSL certificate for the domain.
To resolve this error, click the Fix domain error button and update the CAA record as indicated in the modal/pop-up. Alternatively, if you do not need a CAA record on your domain, you can remove the CAA record.
Troubleshooting Domain Pointing
If you have pointed your domain (allowing up to 24 hours for DNS to propagate) but you’re still seeing either of the following, there are a couple of places to check in your Cloudflare account:
- a banner or warning that your site isn’t pointed to Kinsta and is subject to service interruption.
- a status of “Confirming that you have pointed your domain to Kinsta.”
First, check the Page Rules in your Cloudflare account. If the root domain is redirected to the WWW domain or vice versa, the domain that is being redirected cannot be verified in MyKinsta. To resolve this issue, you’ll need to remove the redirect in Cloudflare Page Rules. This will allow the domain to be verified in MyKinsta. The redirect to the primary domain will now be handled at Kinsta.
Next, in your Security – Firewall rules, allow the user agent kinsta-bot and the IP address 35.194.36.163 so the firewall doesn’t block the bot that confirms your domain is verified and pointed to Kinsta.