If you’d like us to migrate your site for you, we’ve outlined some important notes and the steps to follow below. For more details on the migration process and how migrations work at Kinsta, check out our Migrating Your Site to Kinsta article.
Important Migration Notes
- Company Owners and Company Administrators are the only MyKinsta users who can submit or view a migration request.
- We will complete your migration as soon as possible, which could take up to 1 business day for premium migrations or 2 business days for basic migrations. If we believe processing your migration may take longer, we will let you know at the time we receive the request.
- In some cases, you may need us to migrate a site but not be able to go live right away. If there’s a delay between the migration and taking the site live, you may need to request a second migration.
- We may not be able to migrate highly-customized WordPress installations where the WordPress Core files and directory structure have been altered.
- Setting up DNS and configuring third-party services are not included in our migration service, and you will need to handle these tasks. A few common examples of tasks that you will need to take care of include: updating your domain’s A records or other DNS, pointing name servers to Kinsta’s DNS, setting up a third-party CDN (like Cloudflare or Sucuri), or setting up an email service.
- To perform the migration, we may ask for passwords or other details. We value and guard your privacy. The request form is highly secured over SSL. While we recommend creating temporary credentials for our migrations team to use during your migration, we also know that it isn’t always possible. Once your migration is complete, we would suggest that any credentials shared with us are changed or have their passwords reset.
- We never modify your original website during the migration. It will continue to work as usual during and after the migration. We will keep you updated on the progress of your site migration.
- If needed, you can cancel a pending migration request in MyKinsta.
Migrating WordPress.com Sites
For WordPress.com migrations, we cannot do a traditional migration because WordPress.com does not allow access to the site files or the database. We are only able to export your WordPress content, such as posts, pages, comments, meta tags, etc., and import the content into a new WordPress installation here at Kinsta.
Because we cannot access the site files, we cannot bring over your WordPress theme, plugins, or any other customizations that may have been made to the site. This means your site will not look the same as it does at WordPress.com, and any functionality dependent on a plugin will not work until you re-install your site’s plugins.
After the migration, you or your web developer will need to re-install the theme and plugins and make any customizations again that you made at WordPress.com (if applicable).
Saving and Continuing Your Migration Request
While working on your migration request, if you need to stop and come back to it later, we’ve got you covered. Your request is automatically saved as a Draft if you leave the form and go to another part of MyKinsta in the same tab, if you close the tab in your browser, or even if you close the browser.
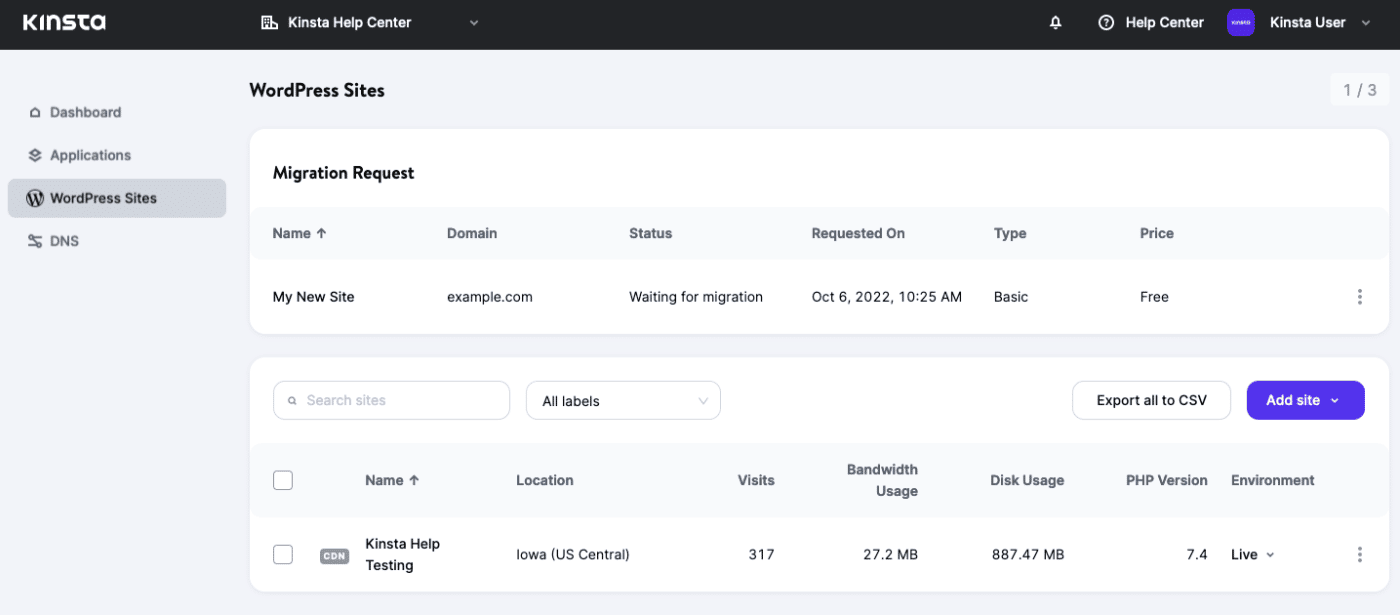
You can view all of your migration requests on the WordPress Sites page in the Migration requests table. If the migration request hasn’t been submitted, it will have a status of draft. You can click on the name to continue filling in the necessary information and submit the request.
If a migration request is pending, you can click on the name to view the migration details page, where you can track the progress of the migration.

Basic Migrations vs. Premium Migrations
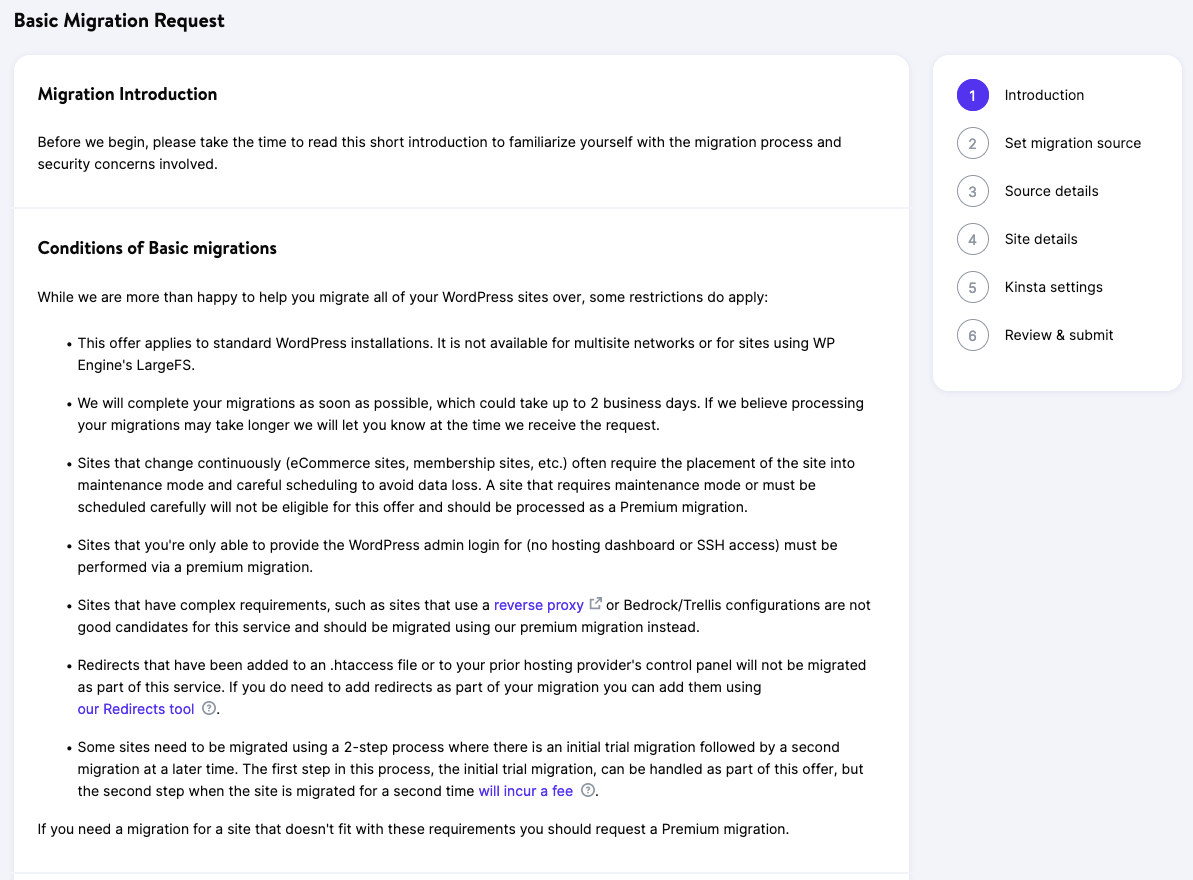
- Unlimited free basic migrations are available for standard WordPress installations only.
- Sites that change continuously (ecommerce sites, membership sites, etc.) often require the placement of the site into maintenance mode and careful scheduling to avoid data loss. A site that needs maintenance mode or scheduling of migration time requires a premium migration.
- A site that uses WP Engine’s LargeFS feature will require a premium migration.
- Migrating a WordPress multisite network requires a premium migration.
- Sites that involve reverse proxies or other complex requirements (e.g., Bedrock or Trellis configurations) require a premium migration.
- If you’re only able to provide the WordPress admin login (no hosting dashboard or SSH access), the migration must be performed as a premium migration.
- If you need to schedule your migration, you can do this with a premium migration.
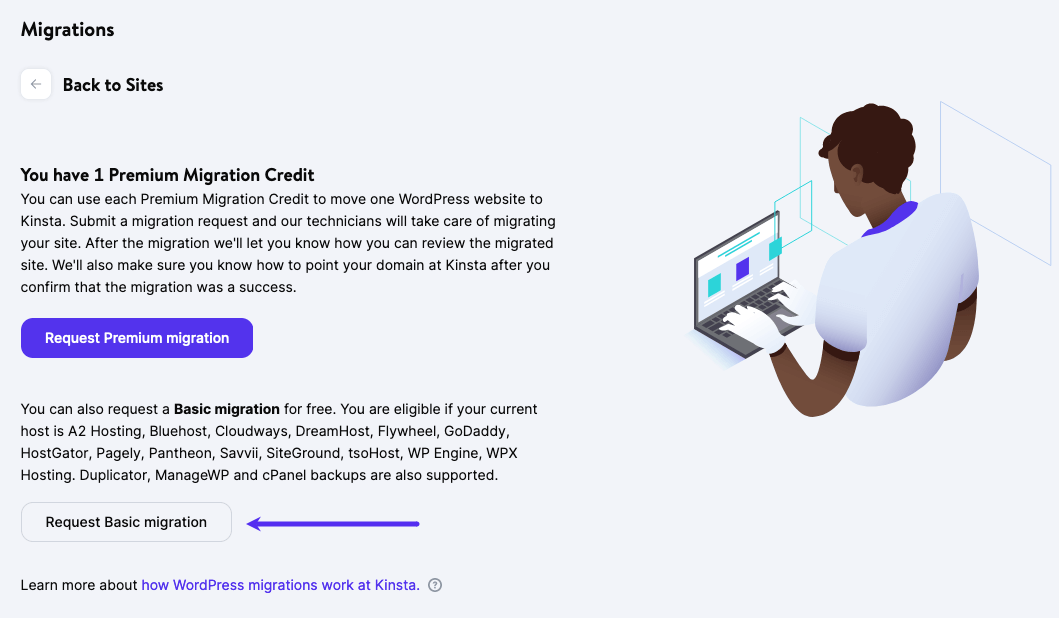
Request a Free Basic Migration
You can request a website migration directly through MyKinsta, and there are two types of basic migrations to choose from:
- From another host (share information about your current hosting provider)
- From a backup file:
- provide a link to files using cloud storage services such as Drive, Dropbox, etc. or
- upload a backup file (whether it’s created with Duplicator, ManageWP, or cPanel) to an existing Kinsta website
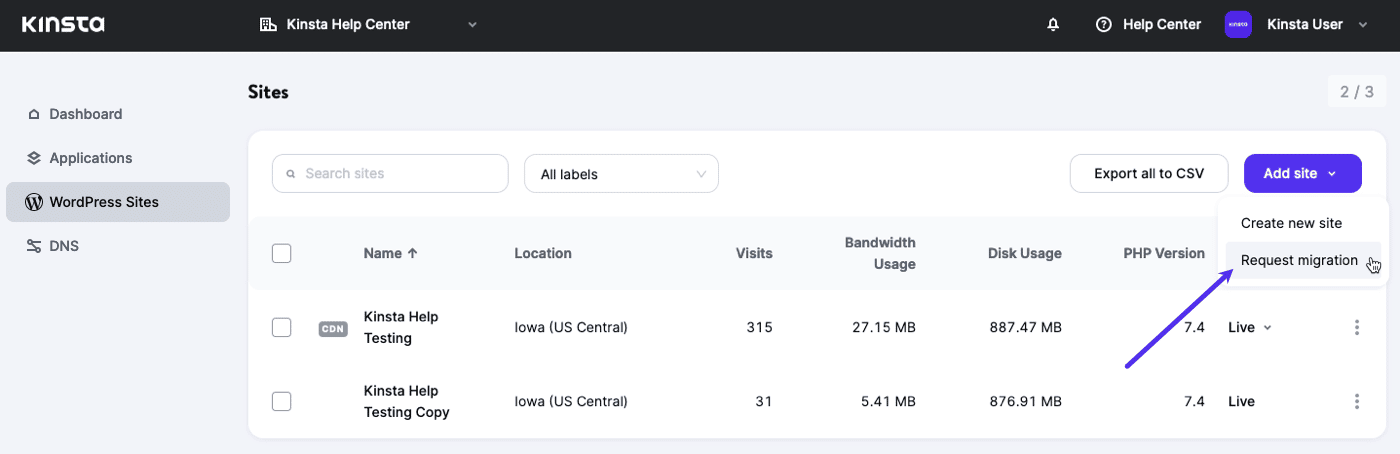
To start a basic migration in MyKinsta, log in and go to WordPress Sites, click the Add site button, and select Request migration in the dropdown menu.

Note: If you haven’t yet added any sites in MyKinsta, you’ll see two buttons on the WordPress Sites page instead of a list of sites. Click the Request migration button to get started with your migration request.

On the Migrations page, click the Request Basic migration button.
After reading through the introduction, including the conditions and other information, click the Next button near the bottom of the page to acknowledge you’ve read and understand the information presented and that you’re ready to continue with the migration request.
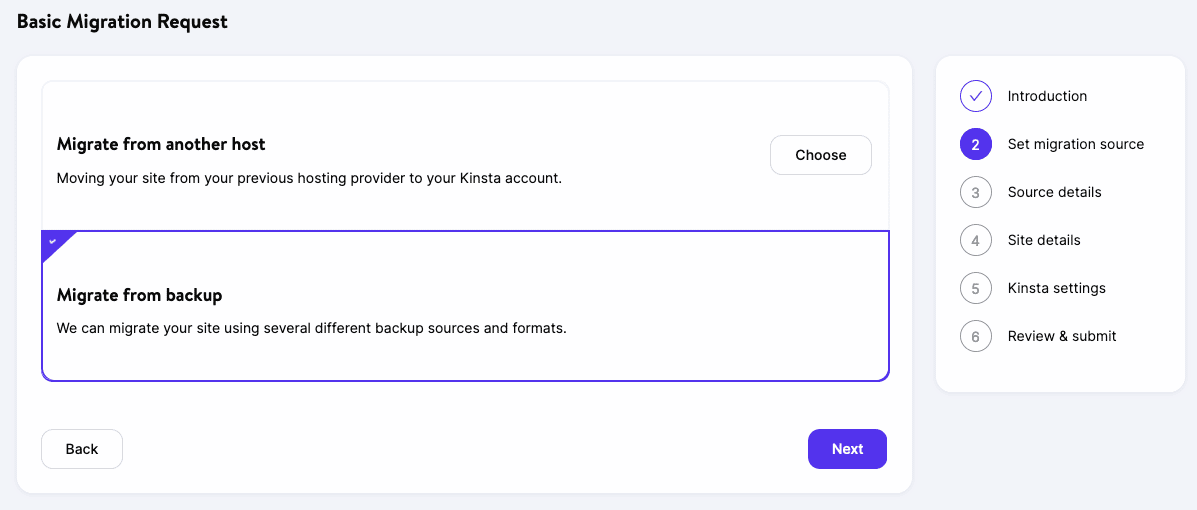
Next, choose which option you want to use as your migration source:
Request a Migration From Another Host
Choose Migrate from another host and click Next to continue.

There’s some information you’ll need to have ready to complete the migration request:
- Details of your current host
- Details of your site setup
- Connection details
Step 1
On the next page, we’ll ask for your current hosting details. For some managed hosts, this includes your host’s name, hosting panel login URL, username, and password.
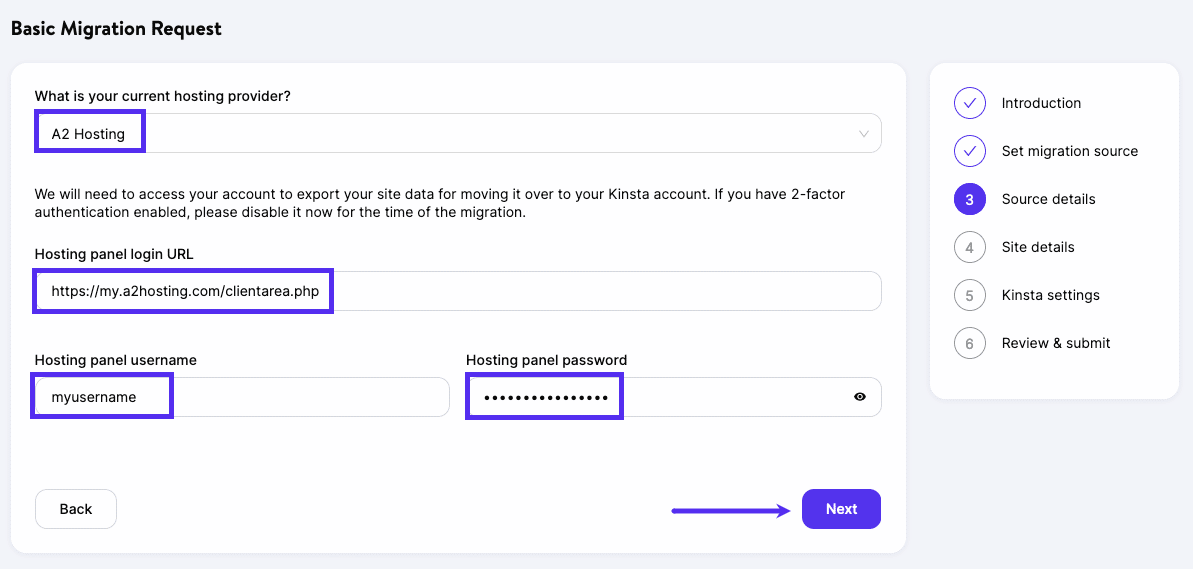
Depending on your current host, we may request additional details like FTP, SFTP, and/or hosting panel credentials. Typically you can find these details in your current hosting provider’s control panel. If you’re unsure of these details, reach out to your current host or ask a member of the Kinsta Support team for help.
If you’re using cPanel, for example, your username and server details are listed in your User Area > My Accounts > Information & Settings page. FTP information can be found under Files > FTP Accounts.
After entering your host information, click Next to proceed to the next step in the request.
Step 2
Next, we’ll ask for your domain, WordPress credentials, WordPress login URL, and whether your site uses HTTPS.
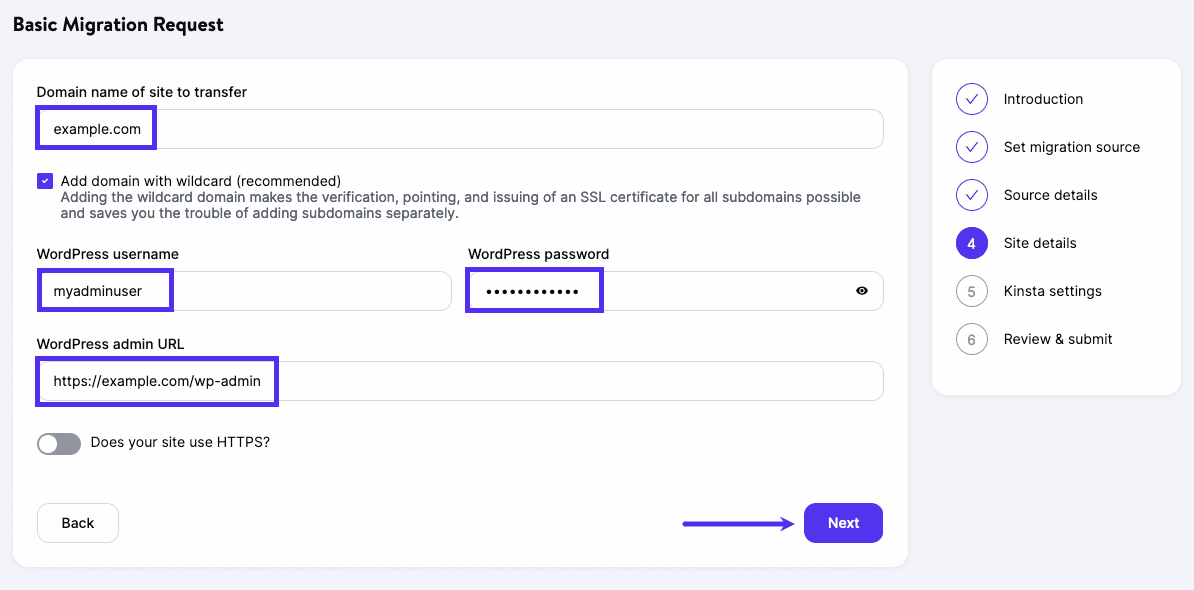
If you indicate that your site uses HTTPS, you’ll be given the option to generate a new SSL certificate in MyKinsta (using our free Cloudflare integration) or upload an existing certificate (if you have the key and certificate file).
After entering your site details, click the Next button to continue.
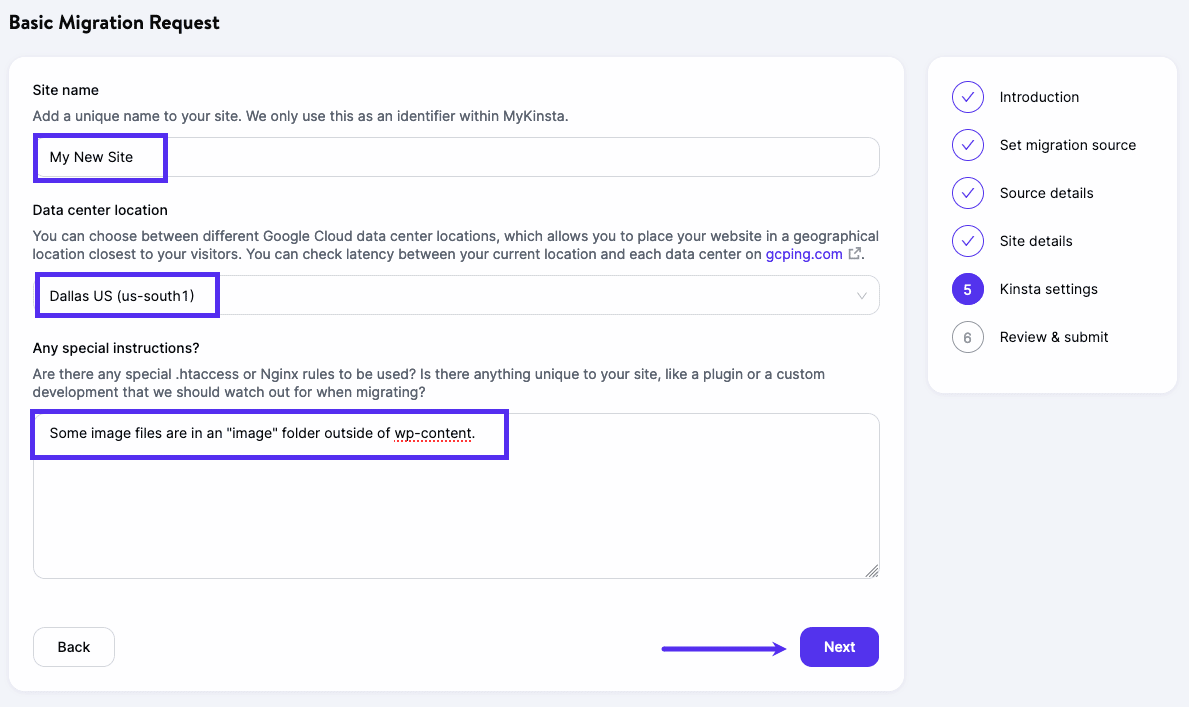
Step 3
Now it’s time to fill in the details for your site’s new home here at Kinsta! Enter a unique name and choose your site’s data center from the 35 data center locations available.
Let us know if there’s any special information or instructions we should know about for your site, such as forcing HTTPS or any special .htaccess or Nginx rules that you may need.
Click Next to review your migration details.
Step 4
Carefully review the details of your request for any typos or errors. If you need to change anything in the request, click the Back button to return to the previous page and update the information.
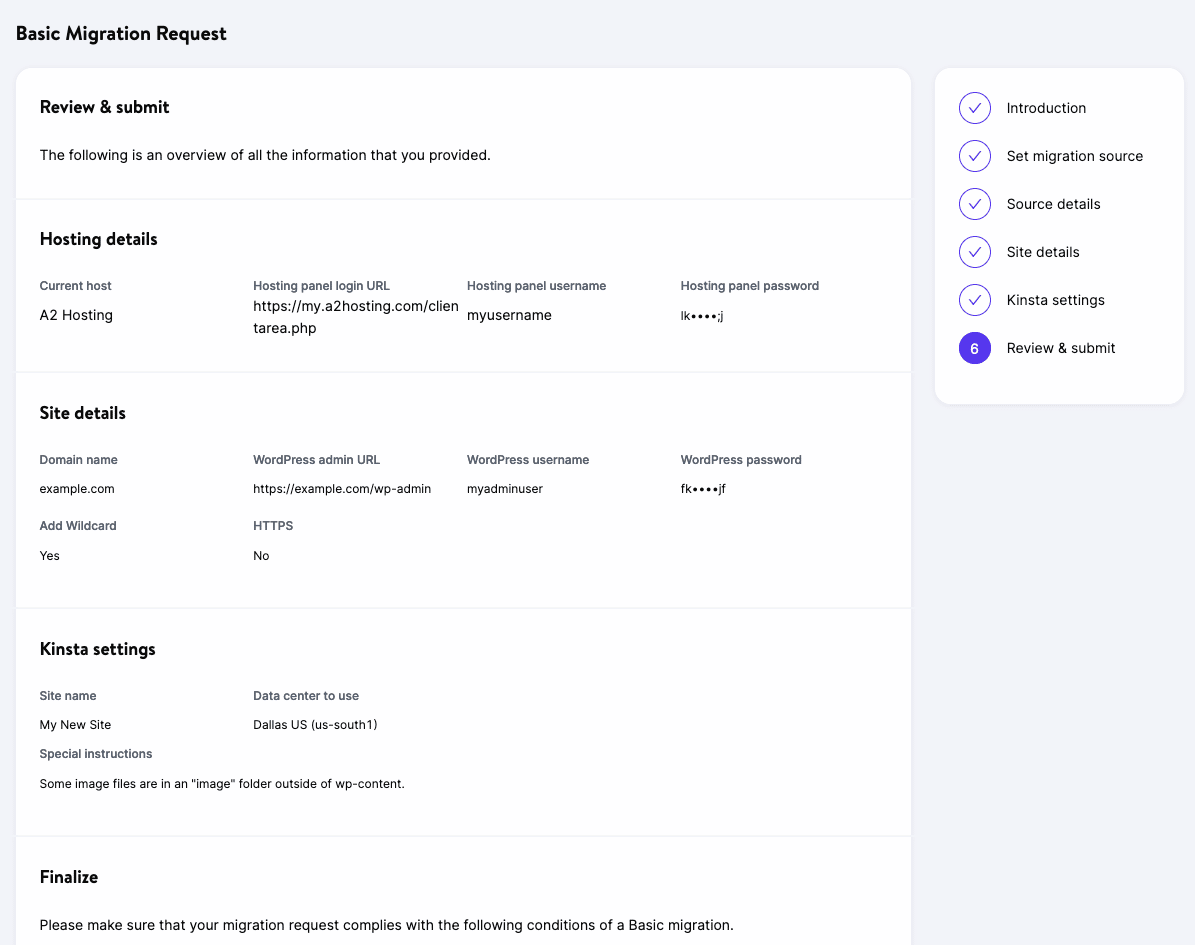
You’ll also be asked to double-check that the site you’re submitting meets the conditions for free Basic migration. If it doesn’t, you’ll want to request a premium migration.
When you’re ready, click on Finish to submit your request.
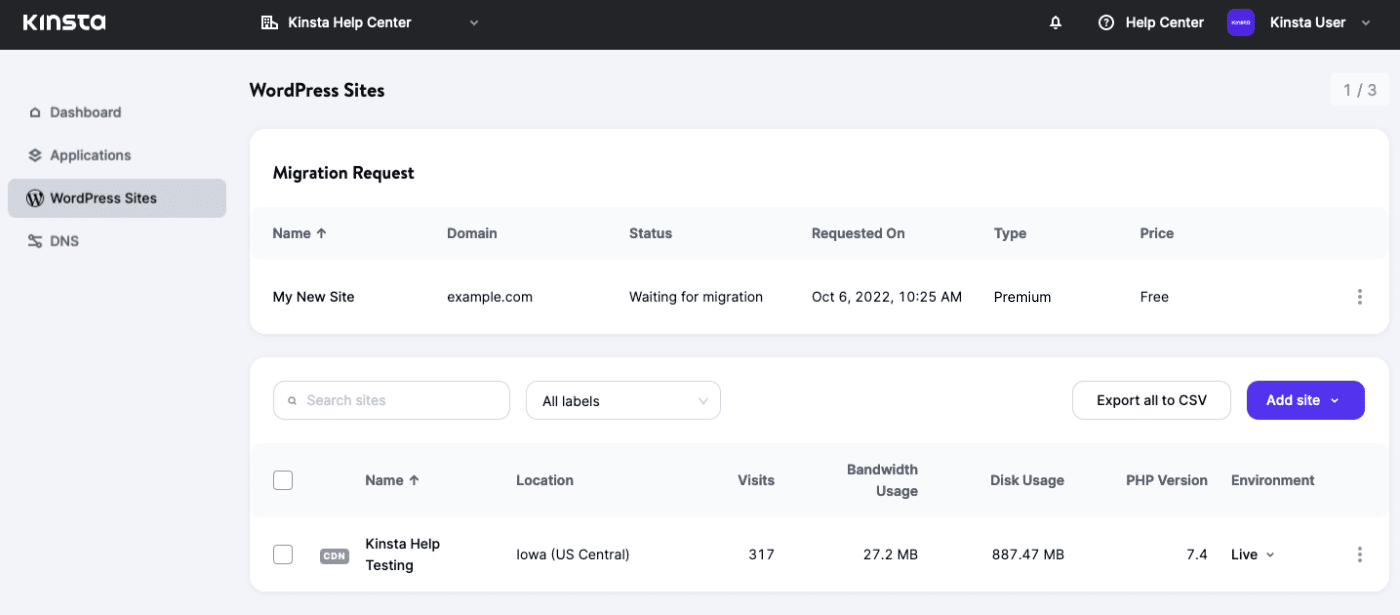
Your pending migrations will show up under WordPress Sites in MyKinsta, and you can check the status anytime. Our Migrations team will also keep you updated on the status.
If you have any additional migrations to submit, click on Add site and select Request migration to begin a new migration request.
Request a Migration From a Backup
Choose Migrate from backup and click Next to continue.
Step 1
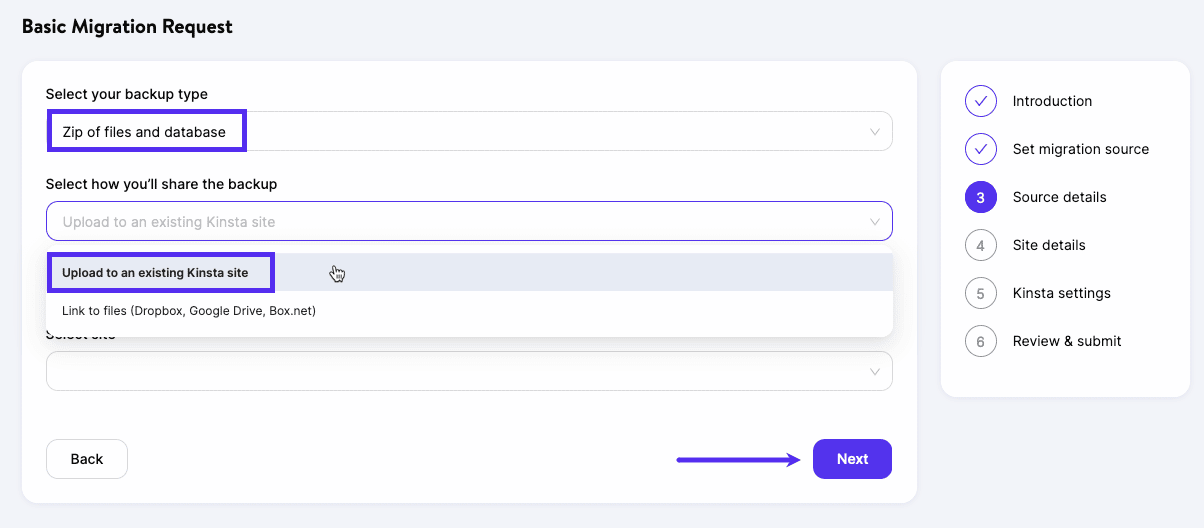
On the next page, we’ll ask for your backup details, including the backup type and how you’ll be sharing the backup with us.
Upload to an Existing Site at Kinsta
If you have an existing site at Kinsta to upload and temporarily store the backup in, you can select it in the field provided. Your existing site on Kinsta will not be altered and will continue to function normally. We will perform the migration to a new site.
Once you choose the site to upload to, we’ll show you the SFTP credentials for uploading the file. Be sure to upload your backup file to the /private folder to make sure it remains private.
Link to Files
Choose this option if your backup is stored in a location you can provide a link to. Make sure the link is accessible to anyone who has the URL or share the backup file with our Migrations team’s email address: [email protected] so they can access the file.
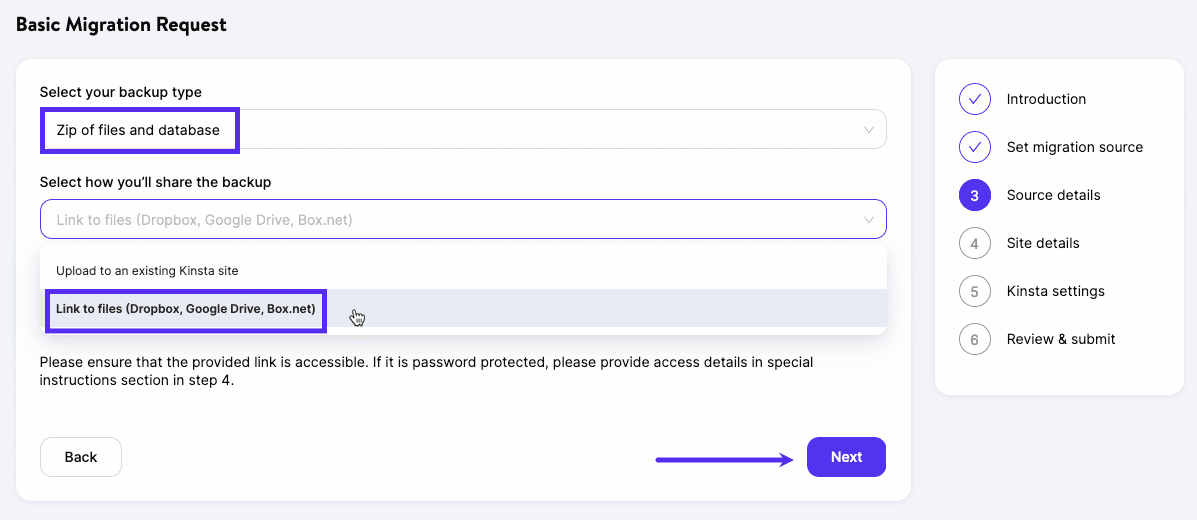
Once you’ve chosen how you’ll be sharing the backup and entered the details, click the Next button to continue.
Step 2
Next, we’ll ask for your domain, WordPress credentials, WordPress login URL, and whether your site uses HTTPS.
If you indicate that your site uses HTTPS, you’ll be given the option to generate a new SSL certificate in MyKinsta (using our free Cloudflare integration) or upload an existing certificate (if you have the key and certificate file available.
After entering your site details, click the Next button to continue.
Step 3
Now it’s time to fill in the details for your site’s new home here at Kinsta! Enter a unique name and choose your site’s data center from the 35 data center locations available.
Let us know if there’s any special information or instructions we should know about for your site, such as forcing HTTPS or any special .htaccess or Nginx rules that you may need.
Click Next to review your migration details.
Step 4
Carefully review the details of your request for any typos or errors. If you need to change anything in the request, click the Back button to return to the previous page and update the information.
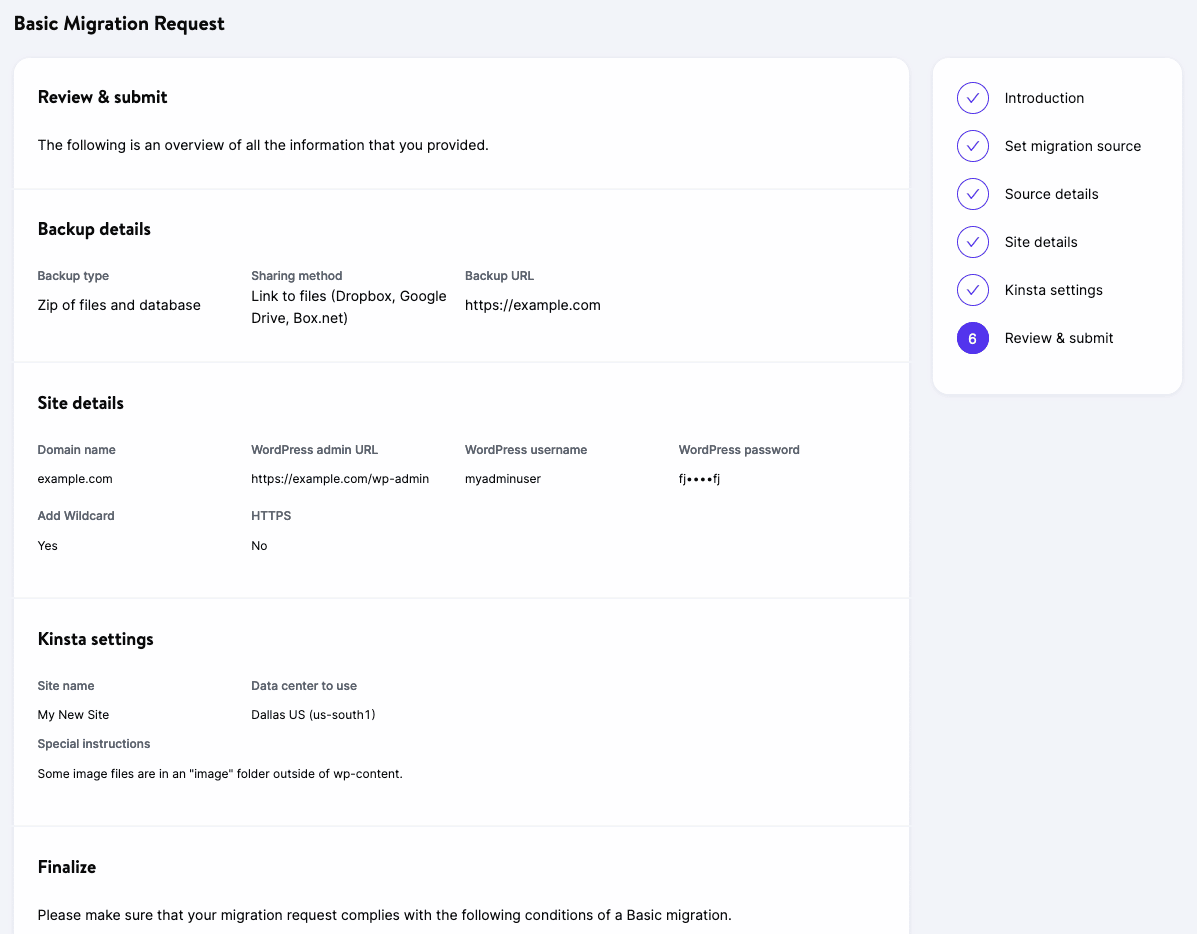
You’ll also be asked to double-check that the site you’re submitting meets the conditions for a free Basic migration. If it doesn’t, you’ll want to request a premium migration.
When you’re ready, click on Finish to submit your request.
Your pending migrations will show up under WordPress Sites in MyKinsta, and you can check the status anytime. Our Migrations team will also keep you updated on the status.
If you have any additional migrations to submit, click on Add site and select Request migration to begin a new migration request.
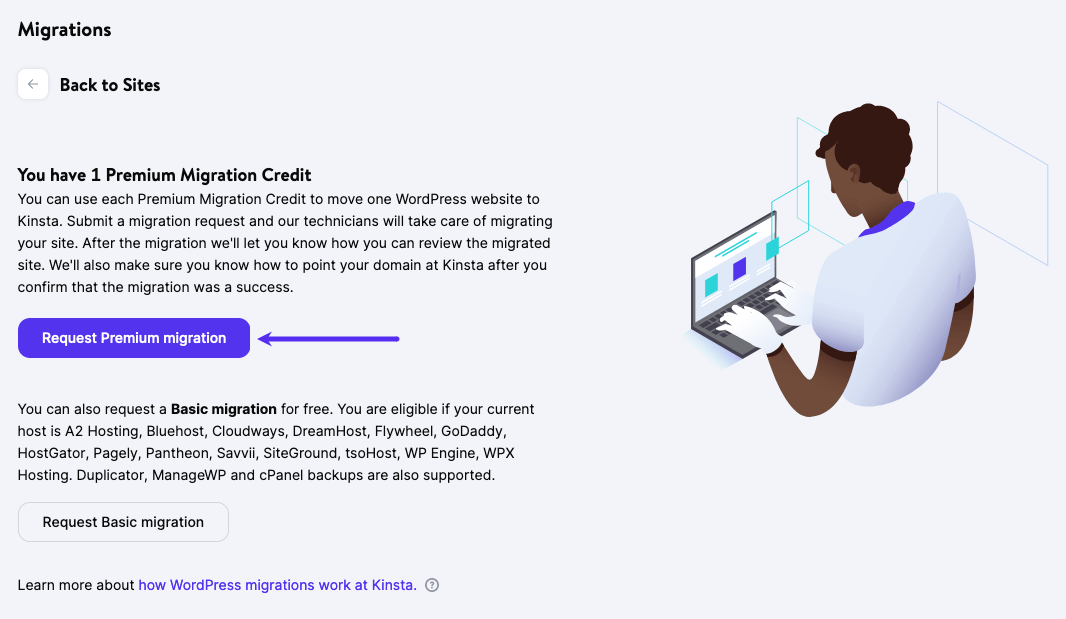
Request a Premium Migration
All of our plans include one or more premium migration credits (see the number included per plan on our plans page). One premium migration credit allows you to request one premium migration from any host free of charge.
Premium migrations are for sites that have complex requirements or need to be scheduled. This typically includes sites that change continuously (ecommerce sites, membership sites, etc.) or those that use a reverse proxy. These often require the placement of the site into maintenance mode, additional setup, and careful scheduling to avoid data loss.
If you have a large number of WordPress sites you’d like us to migrate, we also offer bulk migration pricing.
To start a premium migration in MyKinsta, log in and go to WordPress Sites, click the Add site button, and select Request migration in the dropdown menu.
Note: If you haven’t yet added any sites in MyKinsta, you’ll see two buttons on the WordPress Sites page instead of a list of sites. Click the Request migration button to get started with your migration request.
On the Migrations page, you’ll see the number of premium migration credits you have available. If there are no premium migration credits left, you’ll see the option to purchase additional credits. Each additional premium migration credit costs $100 and will be added to your next invoice.
Click on the Request Premium migration button to start the request process.
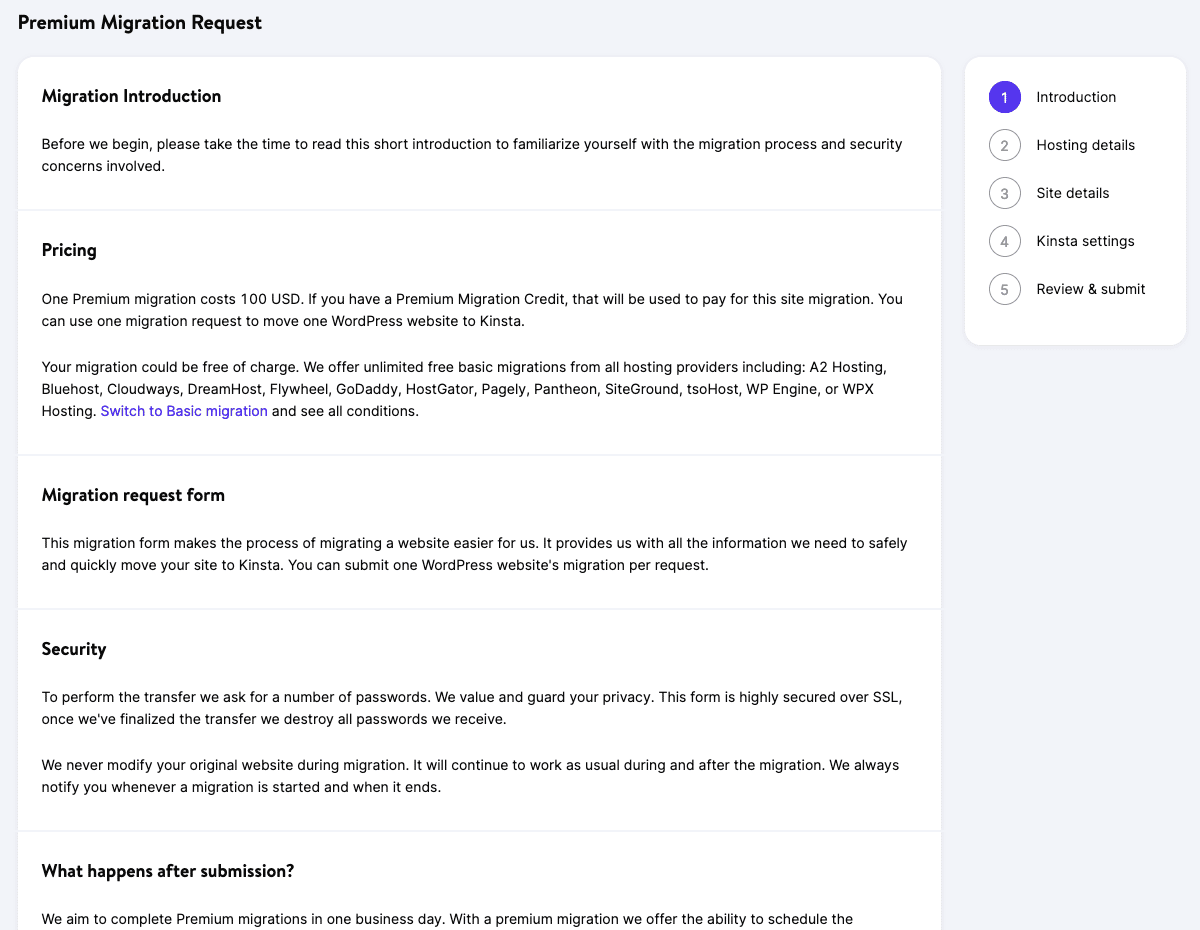
Step 1
There’s some information you’ll need to have ready to complete the migration request:
- Details of your current host
- Details of your site setup
- Connection details
- Optional HTTPS and data center setup
- Payment information — if additional migrations are requested
After reading through the introduction, click the Next button near the bottom of the page to acknowledge you’ve read and understand the information presented and that you’re ready to continue with the migration request.
Step 2
On the next page, you’ll be asked for your current hosting details. This may include your host’s name, hosting panel login URL, username, and password.
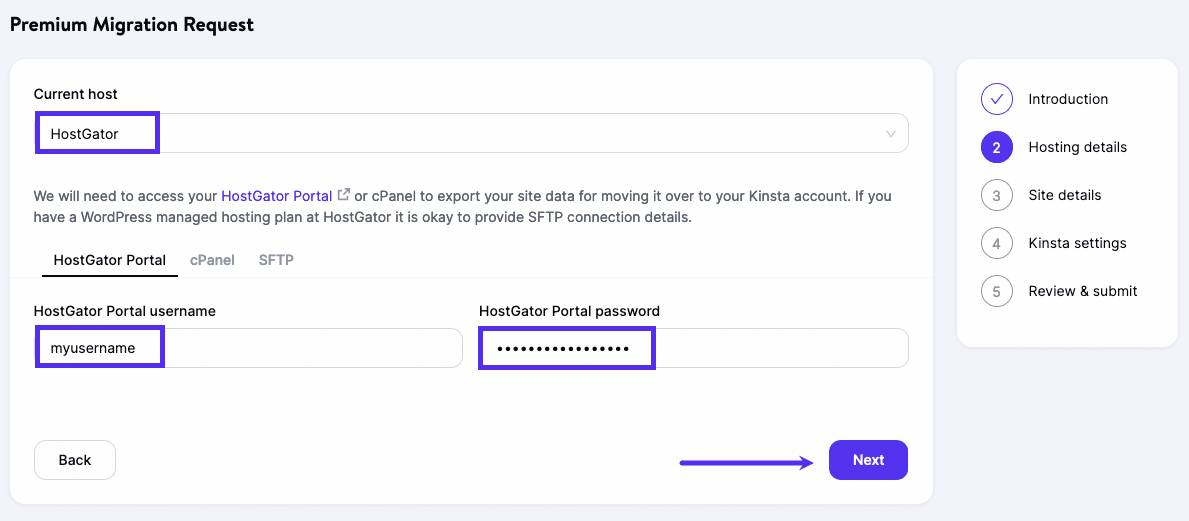
Depending on your current host, we may request additional details like FTP, SFTP, and/or hosting panel credentials. Typically you can find these details in your current hosting provider’s control panel. If you’re unsure of these details, reach out to your current host or ask a member of the Kinsta Support team for help.
If you’re using cPanel, for example, your username and server details are listed in your User Area > My Accounts > Information & Settings page. FTP information can be found under Files > FTP Accounts.
After entering your host information, click Next to proceed to the next step in the request.
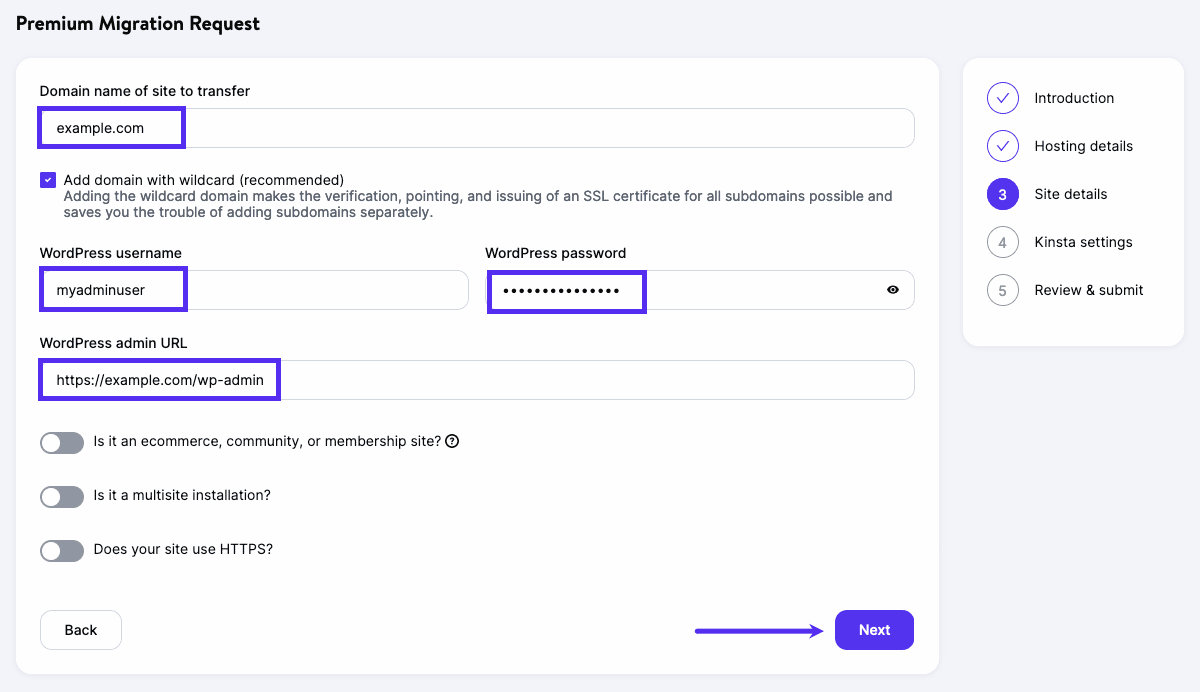
Step 3
Next, we’ll ask for your domain, WordPress credentials, WordPress login URL, and additional configuration options such as if your site is an ecommerce or community site, running over HTTPS, multisite, etc.
If you’re running a highly dynamic site such as WooComerce, check out additional details on how Kinsta handles these types of migrations.
After entering those details, click the Next button to continue.
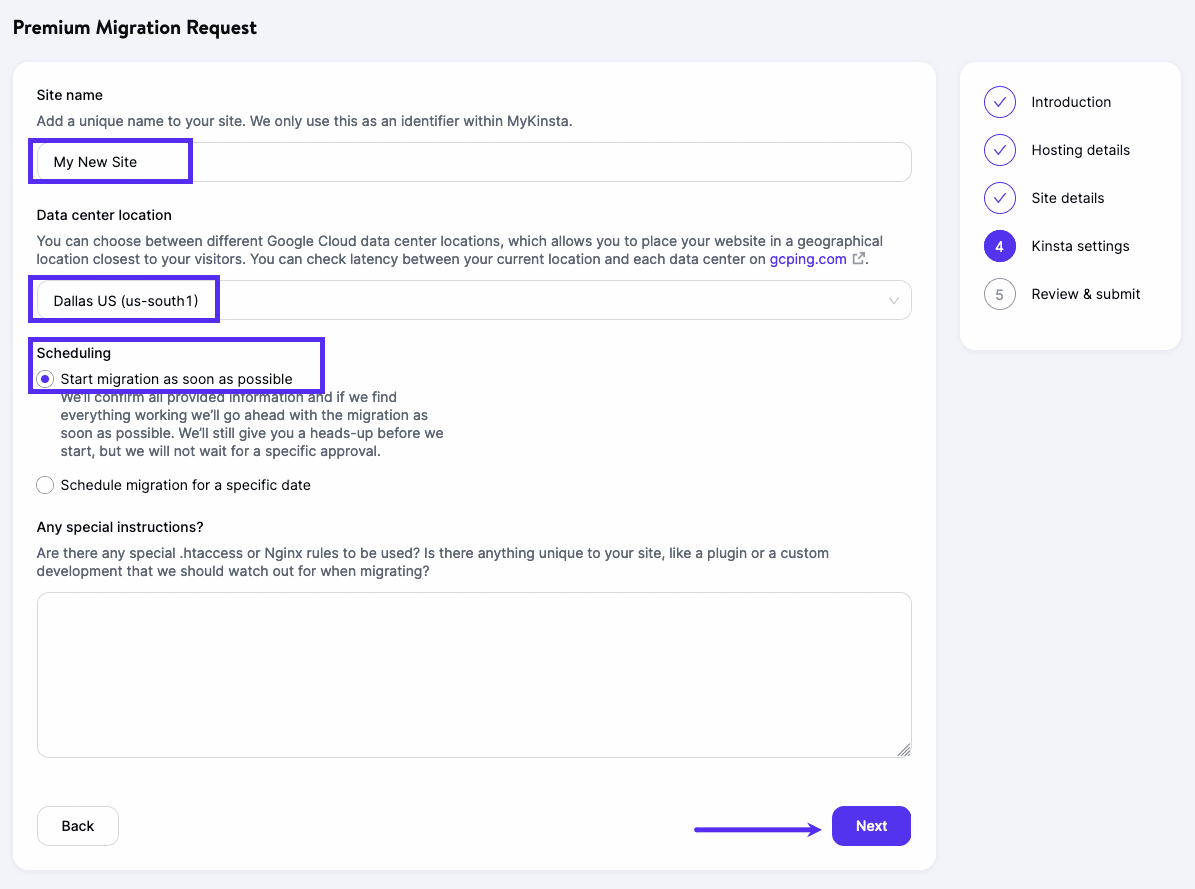
Step 4
Now it’s time to fill in the details for your site’s new home here at Kinsta! Enter a unique name and choose your site’s data center from the 35 data center locations available.
Under Scheduling, choose if you’d like us to start the migration right away or if you’d like to schedule the migration for a specific date.
Let us know if there’s any special information or instructions we should know about for your site, such as .htaccess or Nginx rules, or a plugin or custom development we should watch out for when migrating.
Click Next to review your migration details.
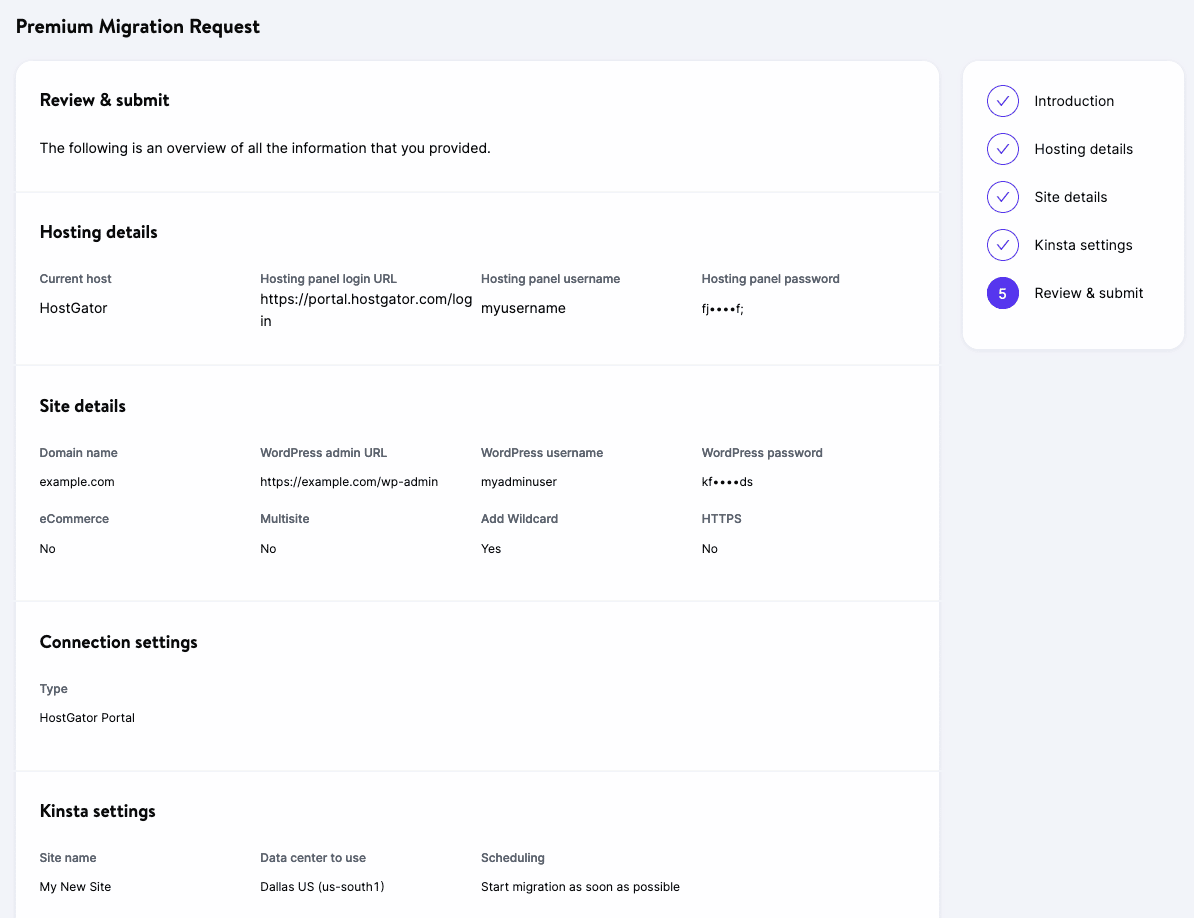
Step 5
Carefully review the details of your request for any typos or errors. If you need to change anything in the request, click the Back button to return to the previous page and update the information.
On the final page, we’ll show you how many premium migration credits you have left. If you don’t have any left, you will also be asked for your payment information. You will be routed to a 2FA confirmation with a one-time password to complete the payment securely.
When you’re ready, click the Finish button.
After submitting the migration form, one of our Migrations team members will get in touch with you to let you know the migration is starting or to schedule the migration, depending on the scheduling option you chose in the previous step.
Your pending migrations will show up under WordPress Sites in MyKinsta, and you can check the status anytime. You will also be continuously updated on the status by our team.
FAQ
How Do I Migrate a Website to Kinsta?
We offer unlimited free migrations from all hosting providers for sites using standard WordPress installations. Kinsta customers can have websites migrated directly through MyKinsta by either sharing information about their current hosting provider or using a backup file.
How Do I Manually Migrate a Website to Kinsta?
If you’re migrating yourself, don’t worry, we’ve still got you covered with in-depth walkthroughs:
- Migrate WordPress Site with SFTP and MySQL
- Migrate WordPress Site with WordPress Duplicator Plugin
- Migrate WordPress Site with Migrate Guru Plugin
- Migrate WordPress.com to WordPress.org
- Powerful WordPress Migration Plugins
How Long Will It Take To Migrate My Website to Kinsta?
We will complete your migrations as soon as possible, which could take up to 2 business days. If we believe processing your migrations may take longer, we will let you know at the time we receive the request.
Does My Website Need To Be on WordPress To Migrate to Kinsta?
Yes, your website must be a WordPress website in order to migrate it to Kinsta or take advantage of our free basic migrations offer. If you are trying to migrate a non-WordPress site, please reach out to our partner WordHerd and follow up with our customer support.
Can I Migrate My Website From a Backup?
Yes, Kinsta customers can have websites migrated by sharing a link to a backup file using cloud storage services such as Drive, Dropbox, etc., or uploading their backup file to an existing Kinsta website, whether it’s created with Duplicator, ManageWP, or cPanel.
What’s the Difference Between a Basic Migration and a Premium Migration?
All of our plans include one or more premium migrations credits (check our plans page for more details). One premium migration credit allows you to request one premium migration from any host free of charge. Premium migrations are necessary for sites that have complex requirements, which typically includes sites that change continuously (eCommerce sites, membership sites, etc.) or those that use a reverse proxy.